
 |
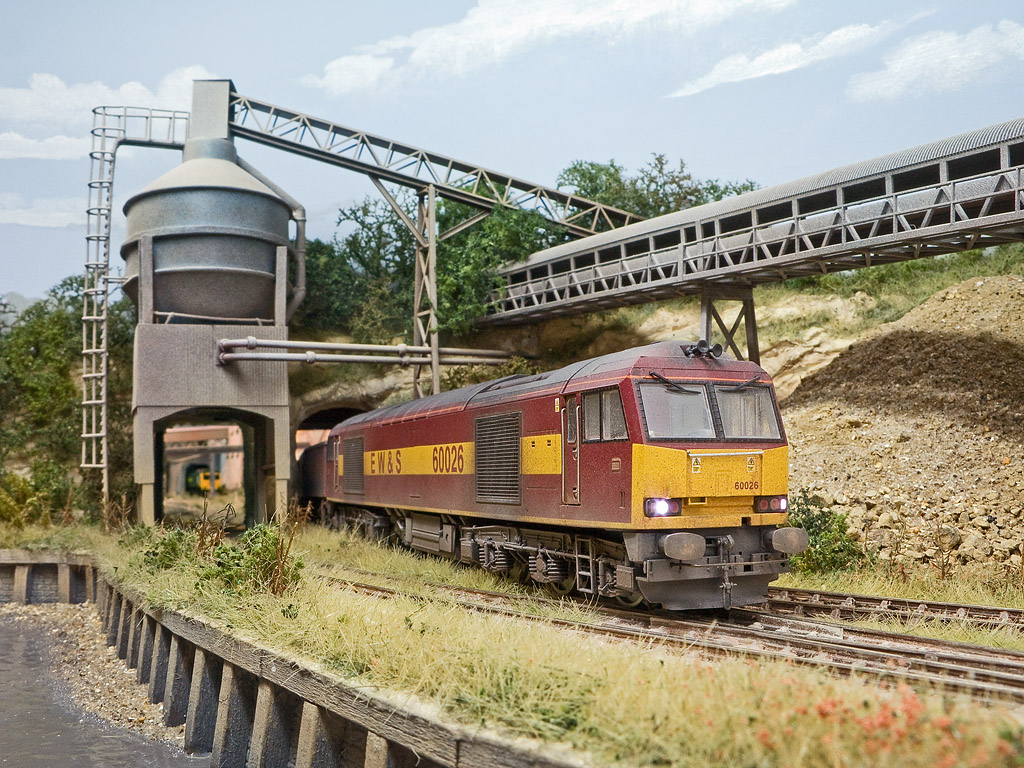
60026 arrives at Cement Quay Old Wharf with a
and empty short rake of MFA high sided box wagons. The loco will uncouple and run around the train before propelling it under the screen for loading. There is no computer Photoshop jiggery pokery here, the sky is part of the layout painted onto a nice hight curved backdrop, something that is worth considering if you intend to photograph your layout alot. |
After spending very many hours and money on creating your favourite railway item in miniature, it’s quite likely you’re going to want to record the outcome to share with the friends, on social media, your own website, or of course the model railway press!
The last decade has seen photography change enormously, with mega-pixels & digits replacing film emulsion in this increasingly digital world we live in. This for the casual snapper this has been nothing but a good thing, for now with even the most inexpensive digital camera, what was quite specialist photography is within the grasp of almost anybody.
OK, well, it’s not quite as simple as that, if it was I wouldn’t have written this guide! However, with a few simple rules and easy to grasp techniques, extraordinary good results can be had from the recent breed of high resolution small digital pocket cameras.
Let’s look at some of the key features that spoil good picture:
• Fuzzy?
• Noisy snowy pictures?
• Camera shake?
• Out of focus?
• Badly lit? • Off colour?
• Too light or too dark?
• Subject too far away?
 |
An out of the box Bachmann 3MT. This has been shot under the
layout's own built in flu lighting which gives nice even illumination.
|
Despite many manufacturers claiming that, ‘their’ camera will turn you into a brilliant photographer with little effort, some basic techniques and a little understanding of photography will help to give some credibility to their claims though ultimately framing and composition is very much down to the user.
Before we take any pictures, we need to be sure that what we record has the potential to be the best quality possible. Always use the finest and biggest – it really does matter! If you’re taking pictures for the printed page, always shoot at the best quality jpeg. The computer screen is quite forgiving, the printed page isn’t. If you’ve leant the camera to the kids or Aunty Mabel, the ‘ordinary’ quality will be fine, after all there’s no point in filling up precious memory with stuff you’ll probably delete anyway (with apologies to any Mabels out there that are top photographers). For serious photography, only ‘Superfine’ (this term may vary depending on camera make) will do. You’ll know when you’ve found it, because it will be the setting that gives you the least number of pictures on your card. Good things come at a price!
Size does matter!
 |
Keep the camera still, the slightest movement
during exposure will spoil the shot
|
Noisy snowy pictures?
With the flash turned off when in dark places, you might well find that you get snowy noisy looking pictures? This is because your camera has automatically boosted its sensitivity. Whilst this may be fine for that boozy snapshot down the pub, you probably won’t want to see this effect in your pictures. Check your camera instruction and you should be able to adjust the camera’s ISO, this being the international standard used to rate digital cameras and film’s sensitivity to light. Simply speaking, the lower the number (ISO) the less noisy or grainy the picture will appear. For this reason we need to ideally select the lowest ISO.
Camera shake?
 |
A small bean bag is a great tool. It stops the
camera from damaging the layout and keeps the camera
nice and still
|
However steady handed you think you are, because we’re photographing something often close up, any movement will be amplified, making the slightest bit of camera shake looking like you took the picture during a 10 plus Richter scale earthquake! A tripod will always be a useful tool, however, if your interest in photography is only passing, understandably it’s unlikely you’ll want to invest in such. There are other options, you could try resting the camera on a cushion or table. A small bag of rice or purpose made bean bag can be very useful (get somebody nifty with a sewing machine or buy a purpose made one), it allowing you to adjust the angle of the camera with little effort.
A nifty trick is to find the camera’s ‘self timer’, that’s the setting you use when you want to do that self portrait whilst on holiday. OK, the idea isn’t that you do a self portrait of you and your favourite piece (well, you can if you like!), use the tool to fire off the camera without touching it – thus reducing the chance of camera shake when the shutter opens. Obviously the camera needs to be supported so that bean bag or bag of rice already mentioned will be ideal!
Out of focus?
Must modern digital cameras will focus very close indeed with their built in auto focus. For real close-ups, you’ll probably need to select ‘macro’ mode, this is often via a button with a ‘tulip’ icon depending on brand of camera. If unsure, check the camera instructions.
Some cameras will allow you to turn the auto focus off. If you have this option, which will again depend on make and model, this will have the advantage of letting you focus exactly where you want to. Another option is to point the camera at the part of the item you want in sharp focus, half press the shutter release (which will set the focus), then with your finger still half pressing the shutter release recompose the shot to the angle you want then fully depress the shutter release. If you’re using the self timer, you can fully press the shutter release button before recomposing, the 10 second delay giving you lots of time.
 |
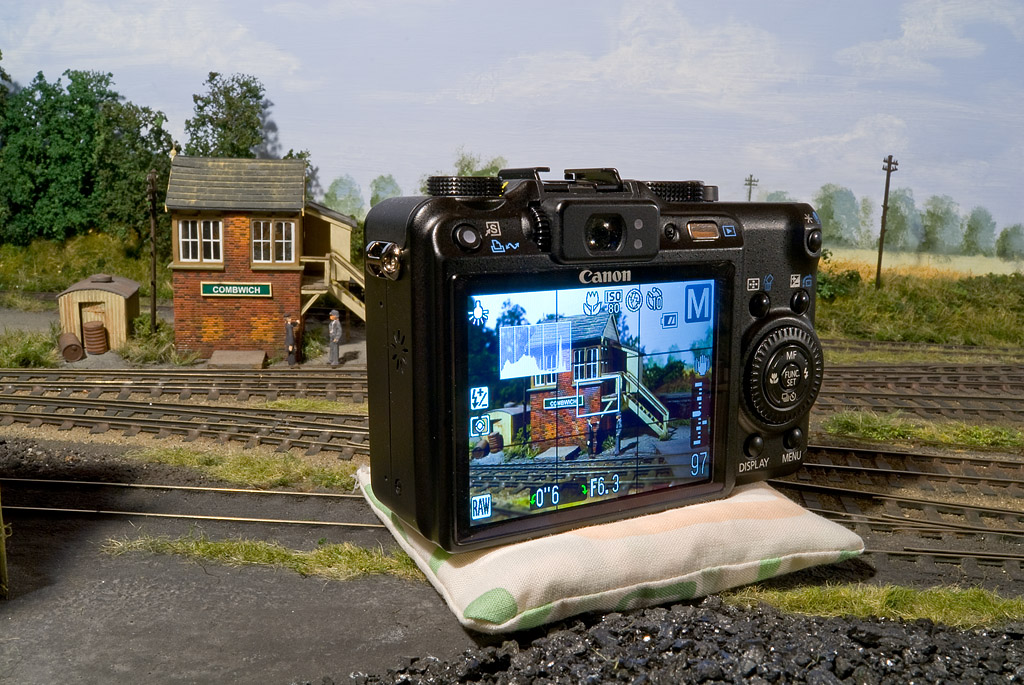
Mendip is captured mid-take at Catcott during the
making of 'The Return of the Titfield Thunderbolt'
during the late summer of 1956. Of course that's
complete tosh, but I can tell you that the is no computer
addition other than the splirt of smoke from the engine,
which was added using the 'clouds' filter in Photoshop.
|
This will again depend on your camera make and model. With many makes, you can set the camera into ‘aperture priority’ mode, this is often displayed as ‘AV’. With this setting you can select a small aperture.
What’s all this small aperture thing? The aperture is an iris much like in ones eye, hold a finger up to your eye and really squint, you’ll notice that you might even be able to see your eyelashes, finger and background all more or less in focus. Choosing a small aperture does the same thing, meaning far more of the picture will be in focus – just what we want! This is known as ‘depth or field’, aperture is normally marked up as numbers, the higher the number, the greater the ‘depth of field’.
Some of the simpler cameras will not let you have any control over aperture or shutter, user changes being via ‘scene modes’ where you select the type of picture you want to take. There are usually modes for ‘sport’, ‘portraits’, ‘landscapes’ fireworks, but sadly no mode for model railway close ups! For this reason you may have a problem getting the camera to select a small aperture for the close ups. However, if you can take your model out side into brighter light, it’s quite likely that the camera’s computer will select a smaller aperture.
If you have yet to buy a small digital camera, and you intend to do quite a bit of model railway photography, it would be a good idea to choose a camera that allows you to have control over the aperture setting.
Badly lit?
You must turn that flash off, direct camera flash doesn’t have a place in our world. Whilst it might be fine for family snaps, it will generally not do our model making any favours, creating flat and quite often washed out pictures with no depth. This can usually be controlled by a button with a ‘lightning’ icon somewhere on the camera.
Getting your subject properly lit, the simplest way, is to take your model outside where the light is good. Overcast and sunshine work well in this respect, both giving different but equally good results.
Another option, especially if photographing a model railway, or using one as a backdrop for an engine or train, is to use the layout’s own lighting. Digital cameras generally have quite good automatic white balance control, which like the eye, should adapt to the lighting on the layout - more on white balance in a moment.
Too light or too dark?
It’s possible that the camera metering is being effected by something very bright or dark within the picture. Photographing a dark engine against a white background or visa versa will do this. Check your camera instructions to see if you can use manual exposure ‘M’ or exposure compensation (often marked as a +/- button).
Off colour?
 |
The resulting photo from the set up below. The computer
smoke is optional of course.
|
The trick when doing this is to experiment a little, after all, cameras and lighting will vary. Sometimes the automatic white balance will refuse to work as well as you like, when this happens, you might want to experiment with some of the white balance ‘pre sets’, again look at your camera manual. White balance settings are often embedded in one of the menus, and will usually be indicated up with simple icons to reflect the type of light you are trying to balance for. Fluorescent lighting and the new ‘energy saver’ bulbs are the ones most likely to cause issue, due to there being so many different types. Some cameras will also allow you to balance for your specific light using a sheet of white paper in the scene prior to taking pictures.
One thing you cannot do, however clever your camera, is to mix different types of light. Daylight does not mix with tungsten, it being very blue and the latter very orange. The same problem occurs when trying to mix fluorescent lighting which can be very green. Keeping to just one type of light gets around this, the camera can only correct for one type at a time.
What makes a good picture?
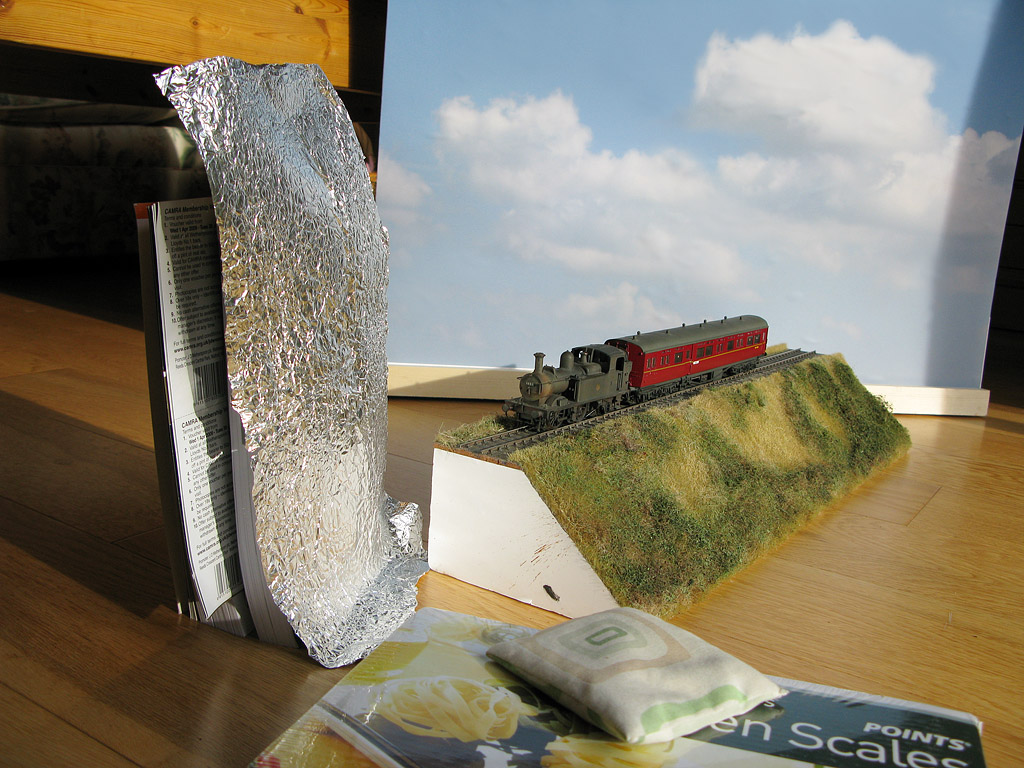 |
Try photographing your trains against a simple back ground.
A large print was used here with the light coming in from the garden. Note the tin foil to reflect a little light into the shadows. |
If you’re photographing an item of rolling stock or engine which isn’t on a layout, try to place it in front of a background which isn’t too busy or distracting. Its simplest form can be placing the subject on a length of clean new track in front of a large sheet of curved paper.
Fill the frame, there’s no point in having a picture which needs to be enlarged at a later stage. Rather than zooming into your subject from far way, keep the zoom wide and fill the frame, you will get a more natural perspective.
Make sure your subject is totally dust free – I’m mean totally! The smallest amount of dust or fluff will really spoil a model.
Digital is a great tool, you can analyse the photographic progress as you go along, adjusting brightness, colour and focus then deleting sub standard images and correcting errors as many times as necessary. These cameras can also be very useful for checking progress of model making, sometimes errors and blemishes only show up when you see them on the back of the camera or computer screen. Because the camera is totally unforgiving, it can help us become more critical and better model maker - hopefully!
Useful camera purchase tips
• Buy a camera that has proper ‘aperture priority’, ‘scene modes’ are unlikely to offer enough flexibility.
• 5 mega pixels should be your minimum resolution.
• Mobile phone cameras are no substitute for a proper camera.
• Get a decent sized memory card, the one often supplied is too small when shooting at the highest resolution and picture size.
• Check out camera reviews online prior to purchasing. www.dpreview.com is a favourite, for not only can you download full size image files, you can also compare specs and performance between models.
Sharp tips for sharpshooters
• Fill the frame!• Keep the camera totally still, rest it on something, tripod, bean bag? Use the ‘self timer’ for hands free operation.
• Select ‘macro’ for close up work.
• Turn that flash off! Light your subject properly, daylight is free and ideal! Experiment with your layout’s own lighting too.
• Check your white balance, ‘auto’ may not always be best – experiment with other settings.
• Use the lowest ISO to minimise noise.
• Always use ‘superfine’ and ‘large’ – size really does matter!
• Get rid of that dust and thumb print on the lens!
• Make sure your subject is clean dust free!
This a very clear and useful article. I love the low down shots you take (from the perspective of someone at trackside looking up at the passing loco). Are these typically taken with your G9 or if you use your SLR what type of lens are you using Chris?
ReplyDeleteThe little cam (a G12 these days) gets a little lower than my normal DSLR so idea for worm eye views. When shooting with a DSLR I tend to use close focusing/macro lenses between 28 and 55mm or so.
DeleteHi Chris, many thanks for the info once again. That's my Christmas wish list sorted!
ReplyDeleteJust found this. Answers so many questions I have squandered trillions of electrons trying to find answers to on line. Thank you,
ReplyDeleteDoug
Great article about model railroad photography!! Many thanks for sharing your experience to newbies!
ReplyDelete